
ESP32 IOT: Simplest Home Automation Design Using Google Firebase To design a home automation system using ESP32, we have 3 basic requirements:
- A mobile or web application to send your message
- ESP32 to receive messages and switch your appliances for automation.
- A database or hosting service
Now for the first part, there are countless possibilities and options available to create an Android application or web application for your home automation. For this basic tutorial, we will be using the MIT app inventor to create a mobile application.
For the database, we will use a Real-time database from Google Firebase. Our application will send a message to Firebase. Out database will be directly connected with ESP32
Our ESP32 will receive data using its library and switch relays accordioning, we can simply switch any appliance connected with relays via mobile application and that is our objective for this project.

Step 1: Setup Firebase Account
For the first step, you have to log in to your Firebase account.
As of August 2021, Firebase offers a free real-time database (only 1). So you can simply log in to firebase using your google account. Go to “Real-time database” and create a database like this:

The Firebase Realtime Database lets you build rich, collaborative applications by allowing secure access to the database directly from client-side code. Your clients may access the database directly from client-side code using the Firebase Realtime Database.
After you create a database copy the address on the top bar inside real-time databases and save it somewhere to remember.
The second thing we need is a secret token that we add in our application and ESP, so to extract that token you can go to project settings -> Service accounts -> and Database secret keys.

Here you can take your token key and save it.
We are providing you two keys as samples for your project. You can use these keys for learning purpose as they are public:
URL: https://esp32andfirebase-14582-default-rtdb.firebaseio.com/
Auth key : ZmU0eBS71t6163togTQVRGSb5qbS5Mp6vOyZPkqi
Now it is time to create an application that take these keys and send our data to this firebase database. We are done with firebase now.
Step 2: Create MIT app inventor application
Now head towards MIT app inventor: https://appinventor.mit.edu/
You can log in using your Gmail account. It’s an integrated development environment for web-based applications. It was previously offered by Google and is currently maintained by the Massachusetts Institute of Technology.

You will have your project dashboard. If you want to learn how to create an application using MIT app inventor you can follow this YouTube tutorial:
But here we are not going to discuss in detail about MIT app inventor, we keep this thread short and concise, so we already have an application ready with those keys(firebase URL and key) we have mentioned above. So you can simply download the following application and install it in your smartphone. Here is APK file link:

If you don’t want to download the above application, to make your own here is a short description:
- Create few buttons aligned and mark them ON and OFF
- Add a firebase addon or plugin from side bar into your main screen
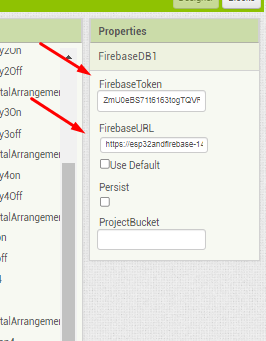
- Inside your firebase settings add your own database URL and key:
- Figure
With all 3 points above done make your buttons act on when clicked to send data to your firebase database using these functions:
With all that set you can export your own application via the build option in the top bar and simply download that apk file from MIT app inventor,
Note: Your smartphone may ask for permission while downloading the application from an unknown source, so simple allow it for MIT app inventor as it is reliable source of mobile applications
With your application done let’s move towards step number 3
Step 3: Setting up ESP32
For esp32 you need to program it along with the Firebase library. For that, you have to download the specific library from the library manager.
Open library manager and download these libraries:

Now you should have esp32 installed into your Arduino IDE, if not you can simply download its board settings from the procedure mentioned in the link below:
Installing the ESP32 Board in Arduino IDE (Windows, Mac OS X, Linux)
Now in your first few line of code, you should see SSID and password as follow:
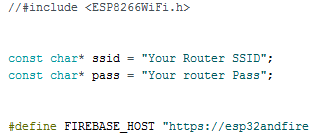
Set your own router SSID and password with a working internet connection to connect your ESP with internet.
if you are using your own database then you should change the key and URL here on the top few lines of the code

After ESP and library are installed select your board and port, connect your esp, and upload this code
Code: ESP 32 Code to Receive data from Firebase
//Google Firebase Smart Home Automation System
#include <WiFi.h>
#include <FirebaseESP32.h>

//#include <ESP8266Firebase.h>
//#include <ESP8266WiFi.h>


const char* ssid = "Your Router SSID";
const char* pass = "Your router Pass";


#define FIREBASE_HOST "https://esp32andfirebase-14582-default-rtdb.firebaseio.com/"       //Firebase Project URL Remove "https:" , "\" and "/"
#define FIREBASE_AUTH "ZmU0eBS71t6163togTQVRGSb5qbS5Mp6vOyZPkqi"      //Firebase Auth Token

FirebaseData firebasedata ;

// https://testprojecttznbaji-default-rtdb.firebaseio.com/

int Dev_1 = 15; //initialize D6 Pin
int Dev_2 = 2; //initialize D0 Pin
int Dev_3 = 0; //initialize D1 Pin
int Dev_4 = 4; //initialize D2 Pin

void firebasereconnect()
{
Serial.println("Trying to reconnect");
Firebase.begin(FIREBASE_HOST, FIREBASE_AUTH);


}


void setup() {

 Serial.begin(115200);
   WiFi.begin (ssid, pass);
   while (WiFi.status() != WL_CONNECTED) {
    delay(500);
    Serial.print(".");
  }
  Serial.println ("");
  Serial.println ("WiFi Connected!");
firebasereconnect();

    pinMode(Dev_1,OUTPUT);//initialize the Device OUTPUT
    pinMode(Dev_2,OUTPUT);//initialize the Device OUTPUT
    pinMode(Dev_3,OUTPUT);//initialize the Device OUTPUT
    pinMode(Dev_4,OUTPUT);//initialize the Device OUTPUT


}

void loop() {

     Serial.println(Firebase.get(firebasedata,"/S1"));


  if (Firebase.get(firebasedata,"/S1")) {
    if (firebasedata.dataType() == "string") {
      String D1 = firebasedata.stringData();
          if (D1=="1"){
            Serial.println("Rcvd D1 ON");
              digitalWrite(Dev_1,LOW); //Device1 is ON
          }
          else if (D1=="0"){
             Serial.println("Rcvd D1 OFF");
              digitalWrite(Dev_1,HIGH);//Device1 if OFF
            }}}
  if (Firebase.get(firebasedata,"/S2")) {
    if (firebasedata.dataType() == "string") {
      String D2 = firebasedata.stringData();
          if (D2=="1"){
              digitalWrite(Dev_2,LOW);//Device2 is ON
          }
              else if (D2=="0"){
             digitalWrite(Dev_2,HIGH);// Device2 os OFF
            }}}
  if (Firebase.get(firebasedata,"/S3")) {
    if (firebasedata.dataType() == "string") {
      String D3 = firebasedata.stringData();
          if (D3=="1"){
              digitalWrite(Dev_3,LOW);//Device3 is ON
          }
              else if (D3=="0"){
              digitalWrite(Dev_3,HIGH);//Device3 is OFF
            }}}

  if (Firebase.get(firebasedata,"/S4")) {
    if (firebasedata.dataType() == "string") {
      String D4 = firebasedata.stringData();
          if (D4=="1"){
              digitalWrite(Dev_4,LOW);//Device4 is ON
          }
              else if (D4=="0"){
                 Serial.println("Rcvd D4 OFF");
              digitalWrite(Dev_4,HIGH);//Device4 is OFF
            }}}
            delay(200);
				}
(Note: If you try to upload a new sketch to your ESP32 and get the warning “A fatal error occurred: Failed to connect to ESP32: Timed out…,” it means that the connection to the ESP32 has been lost. Connecting…“. It means your ESP32 isn’t flashing or uploading anything)
You can press the boot or reset button at that stage to make a successful upload.
This code processes the information as follow:
- First we connect to our wifi using provided SSID and password
- After connecting to wifi our esp try to connect with Firebase database provided Auth key and URL in the code.
- Now when your Variable like S1 here receives any message from database, these conditional statements will get triggered and turns your relays on and off.
So now code if your code is running, the actual part of the project is done, it is time for some connections and hardware.
To start with hardware first you need a relay module.
How does a relay module work? An electromagnetic power relay module is an electrical switch that operates by electromagnetism. This single, low-powered signal from the microcontroller activates the magnets. If the electromagnet is active, it will pull to either open or close a circuit when energized. In simple, we can trigger a switch using the small signal from our ESP.
So we connect our ESP and relay module like this in the figure from

Now you can connect your appliances from the relay module and they will get open and close using your signal from the mobile phone application
Congratulations !! After getting every step done successfully, now you are able to send message from your own mobile application to your home appliances and turn them on and off.
The process we used here is as follow:
We send messages from mobile application to change values in our database
We have our real-time data base on firebase google that stores our data from the application
We connected our Database to ESP32 receives that message and change our switches accordingly.
What else we can do?
- We can make this home automation system voice-operated using little gadgets from MIT app investors, turn our voice into text and send that text to the database, receive that text in esp32 and change conditions accordingly.
- If you are using ESP8266 then the process may vary a little, the library will be changed so you need to download different library also different boards to install in Arduino IDE
- You can add passwords, you can use multiple databases using the firebase pro version or different firebase accounts, or a custom mobile applications using any different tool.
Hope this simple and step-by-step guide helps you. If it does, please follow Go Techies for more, and let us know in the comments if you have any suggestions.
Project video in Urdu/Hindi for ESP32 IOT: Simplest Home Automation design using google Firebase is below:
Regards
Shah Fahad Ahmed
