Hello everyone here !! Welcome to the complete build tutorial about how you can build a DC motor-based RC car using ESP32 Bluetooth.
I know you are looking for something quick and easy to build a simple RC car. Now you will find a lot of tutorials using Arduino, Bluetooth, and DC motors to build RC cars. But why use more components when you can build one that is more compact, simple, and easy?
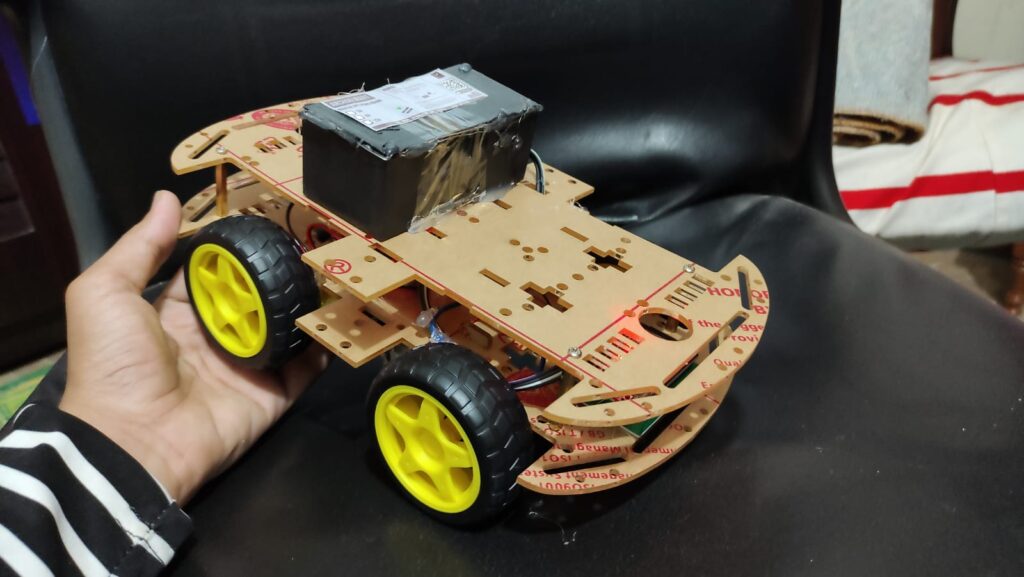
To start with let’s have a look at what our car is going to look like in a few pictures:

Now here is list of component you need to start with: (You can easily find these components online or contact us if you need any help)
1- ESP32 Dev module (you can use any other module but not NodeMCU)
2- L298 Motor Driver module
3- 4 x DC motors (Yellow motors)
4- Jumper wires
5- 9V Battery (we are using Archon mart 9V powerbank works fine)
6- Acrylic body (pre made will be better)
& that’s it.. Nothing else !!
Now to start with.. First attach all 4 motor beneath the body like this:
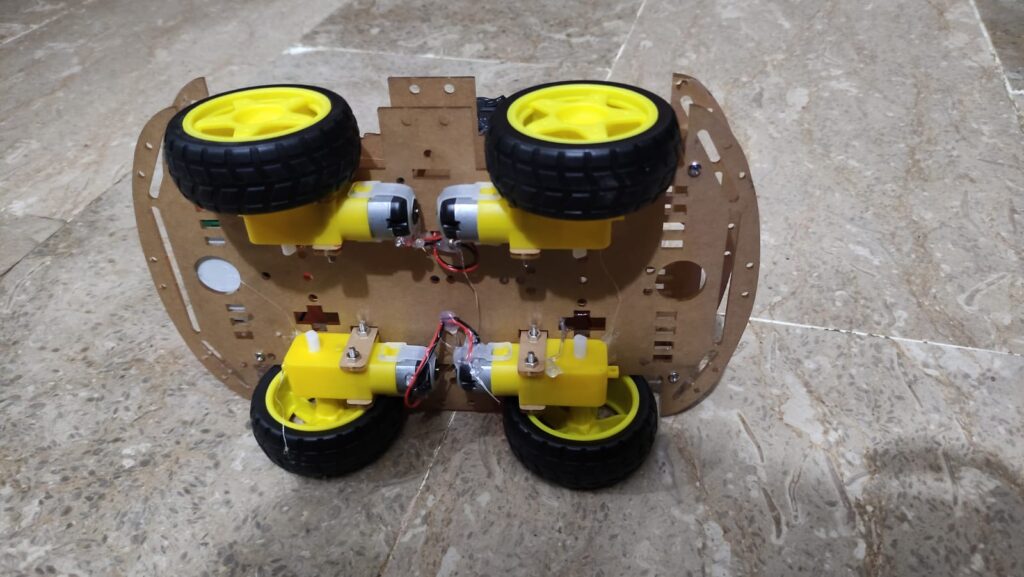
Now take there wires up into the body & check if they are working by connecting them directly with power source or battery(this is important as if they are not working then you might have to face trouble taking them out again later)
So if they all are working check direction of left and right motors, both left motors should run forward with some wire config, combine those wires so now you have combined 4 wires into 2 each side.
Now take ESP32 & L298n motor driver and connect your motors like this as per this circuit diagram:

the wiring for this Bluetooth car using esp32 is very easy:
Let’s look at it in little details.
All you need to do is connect 4 wires from ESP, we have used pins 12, 14, 26, and 27 from ESP in the diagram above. Then connect all 4 motors as described above into the motor driver, 2 on one side, and 2 on the other. (note that if your DC motor is going in the opposite direction just shuffle its wires)
Then connect the positive terminal of the battery to the 12V block of L298n and the negative to Ground, also connect ground and 5V with ESP32 ground and Vin.
After completing the wiring, it’s time to assemble the roof and any other props you need & get started with coding. First of all you should try to manually provide pulses by using a simple code into ESP32 and see if the motors are moving. After testing the motors out, here is code to run Bluetooth-controlled RC Car:
#include "BluetoothSerial.h"
BluetoothSerial ESP_BT; //Object for Bluetooth


#define RF 14
#define LB 27
#define LF 26
#define RB 12


int incoming;

void setup() {
  Serial.begin(9600); //Start Serial monitor in 9600
  ESP_BT.begin("Car1");

  Serial.println("Bluetooth Device is Ready to Pair");


pinMode(RF,OUTPUT);
pinMode(LF,OUTPUT);
pinMode(LB,OUTPUT);
pinMode(RB,OUTPUT);
digitalWrite(RF,LOW);
        digitalWrite(LB,LOW);
        digitalWrite(LF,LOW);
        digitalWrite(RB,LOW);

}

void loop() {

  if (ESP_BT.available()) //Check if we receive anything from Bluetooth
  {
    incoming = ESP_BT.read(); //Read what we recevive
    Serial.print("Received:"); Serial.println(incoming);

    if (incoming == 83)
        {
        digitalWrite(RF,LOW);
        digitalWrite(LB,LOW);
        digitalWrite(LF,LOW);
        digitalWrite(RB,LOW);

        }

          if (incoming == 66)
        {
        digitalWrite(RF,HIGH);
        digitalWrite(LB,LOW);
        digitalWrite(LF,HIGH);
        digitalWrite(RB,LOW);

        }

            if (incoming == 70)
        {
        digitalWrite(RF,LOW);
        digitalWrite(LB,HIGH);
        digitalWrite(LF,LOW);
        digitalWrite(RB,HIGH);

        }

            if (incoming == 76)
        {
        digitalWrite(RF,HIGH);
        digitalWrite(LB,HIGH);
        digitalWrite(LF,LOW);
        digitalWrite(RB,LOW);

        }

            if (incoming == 82)
        {
        digitalWrite(RF,LOW);
        digitalWrite(LB,LOW);
        digitalWrite(LF,HIGH);
        digitalWrite(RB,HIGH);

        }
                    if (incoming == 68)
        {
        digitalWrite(RF,LOW);
        digitalWrite(LB,LOW);
        digitalWrite(LF,LOW);
        digitalWrite(RB,LOW);

        }

                           if (incoming == 6)
        {

        digitalWrite(RF,HIGH);
        digitalWrite(LB,HIGH);
        digitalWrite(LF,LOW);
        digitalWrite(RB,LOW);
          delay(300);
        digitalWrite(RF,LOW);
        digitalWrite(LB,LOW);
        digitalWrite(LF,LOW);
        digitalWrite(RB,LOW);

        }

                           if (incoming == 5)
        {

      digitalWrite(RF,LOW);
        digitalWrite(LB,LOW);
        digitalWrite(LF,HIGH);
        digitalWrite(RB,HIGH);
           delay(300);
        digitalWrite(RF,LOW);
        digitalWrite(LB,LOW);
        digitalWrite(LF,LOW);
        digitalWrite(RB,LOW);

        }

                           if (incoming == 4)
        {
   digitalWrite(RF,HIGH);
        digitalWrite(LB,LOW);
        digitalWrite(LF,HIGH);
        digitalWrite(RB,LOW);
           delay(400);
        digitalWrite(RF,LOW);
        digitalWrite(LB,LOW);
        digitalWrite(LF,LOW);
        digitalWrite(RB,LOW);

        }

                           if (incoming == 3)
        {

                 digitalWrite(RF,LOW);
        digitalWrite(LB,HIGH);
        digitalWrite(LF,LOW);
        digitalWrite(RB,HIGH);

        delay(400);
        digitalWrite(RF,LOW);
        digitalWrite(LB,LOW);
        digitalWrite(LF,LOW);
        digitalWrite(RB,LOW);

        }
  }
  delay(20);
}
Upload this code to ESP32 and you are ready to go. You can now turn the mobile application ON and connect with the car (you may have to pair your bluetooth first from bluetooth settings)
Some important links:
Mobile application : https://play.google.com/store/apps/details?id=braulio.calle.bluetoothRCcontroller
How to install esp32 in Arduino IDE: https://randomnerdtutorials.com/installing-the-esp32-board-in-arduino-ide-windows-instructions/
Basic Arduino programming tutorials: https://youtu.be/VF9sYk7Z4VE?list=PLyXdYFitausD1J26XV8vnZbSOySQyD0f5
That`s it for this tutorial. You can ask any questions in comments below or comment pictures down if you have completed the project.
Keep following gotechies.net for more.
